artprize-mobile-app
iOS MapKit ArtPrize Application
Overview
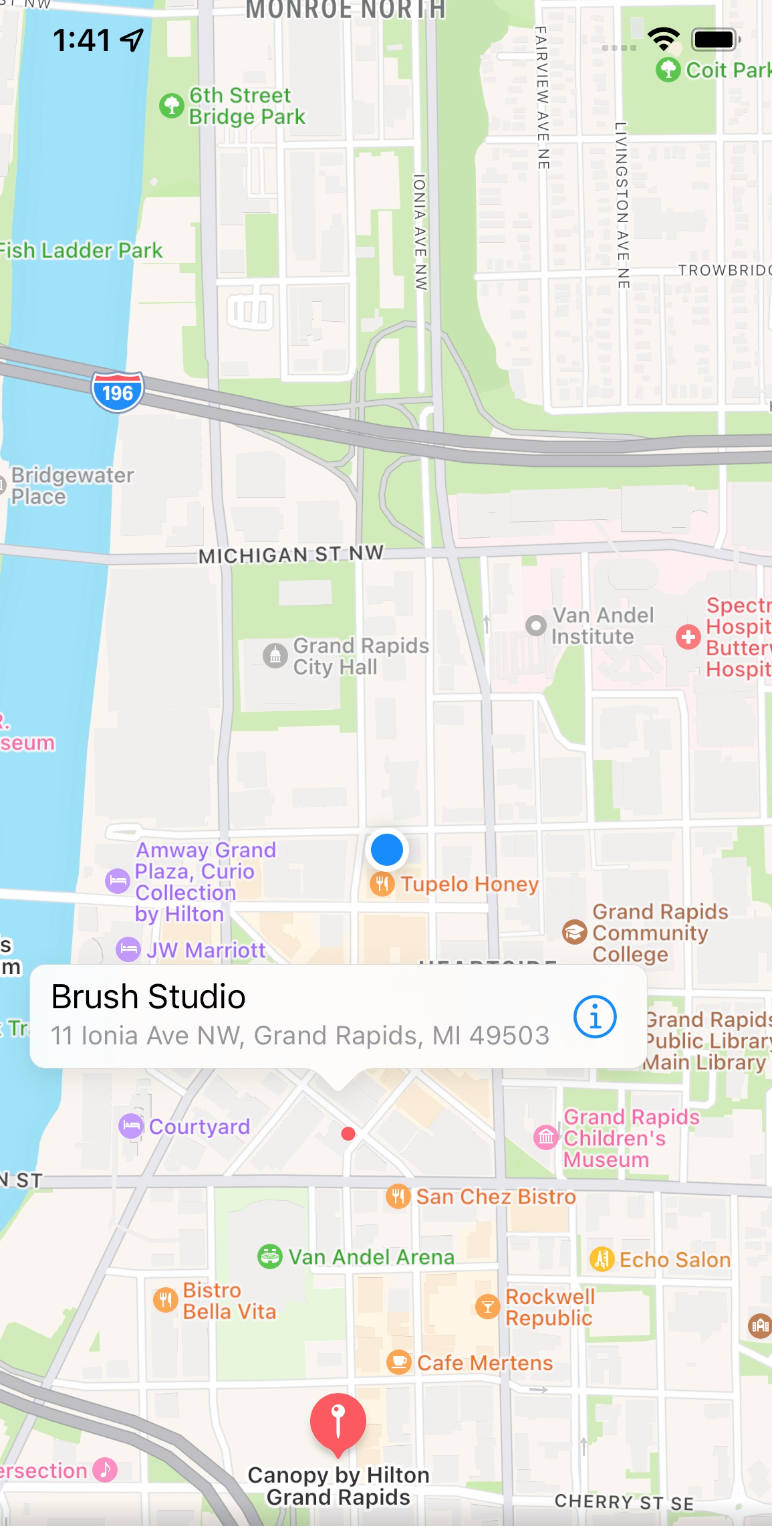
iOS’s MapKit is an API that offers access to much of the native maps applications functionality with extensive customization to its properties. It allows for custom overlays, directions functionality, geographical information, and more responsive native features to be integrated into a Swift application. This tutorial will guide you through the process of setting up MapKit in your own environment and creating an application that utilizes some third-party services to create an ArtPrize application providing art venue information and routing around Grand Rapids. The end result will look something like this:
Getting Started
Setting up the environment
Make sure you have access to XCode and at least XCode version 12.0.0 and at least iOS 15 installed on your device. Conveniently, since the MapKit library is already in Swift, it can simply be imported into the project without pod installation.
Coding Instructions
Defining the structure of our data
Note
We opted to store all data relevant to venues and artworks within the app itself. However, a more production-ready approach could be some sort of cloud storage integration such as Firebase. Cloud integrations go a bit beyond the scope of this tutorial, so we’ll instead be making use of data defined directly within this program’s classes.
At a high level, the data is structured around venues as our largest hierarchical containers. Each Venue structure contains the following attributes:
| Attribute Name | Data Type | Description |
|---|---|---|
name |
String? |
The name of the venue |
image |
UIImage? |
An image stored in Assets.xcassets |
address |
String? |
The address of the venue |
location |
CLLocationCoordinate2D? |
The coordinates of the venue |
artworks |
[Artwork]? |
An array of artworks within the venue |
description |
String? |
A description of the venue |
As you can see, each Venue contains an array of Artwork objects. The attributes contained in each Artwork object are as follows:
| Attribute Name | Data Type | Description |
|---|---|---|
title |
String? |
The title of the work |
image |
UIImage? |
An image of the work |
artist |
String? |
The name of the artist of the work |
description |
String? |
A long-form description of the work |
medium |
String? |
The medium of the work |
width |
String? |
The width of the work |
height |
String? |
The height of the work |
Providing the data
Now that we have the structure to our data, we can define it within the VenueModel class. Here we simply created a helper function createVenues() that will fill out the Venue and Artwork structures. Additionally, we’ve defined a getVenuesByName() function, which will be used for pulling up the correct venue when we select its corresponding annotation on the map.
import Foundation
import CoreLocation
import UIKit

class VenueModel {
    fileprivate var venues : [Venue] = [Venue]()

    init() { createVenues() }

    func getVenues() -> [Venue] { return self.venues }

		func getVenueByName(name: String) -> Venue? {
        if let i = venues.firstIndex(where: { $0.name == name }) {
            return venues[i]
        }
        return nil
    }

    fileprivate func createVenues() {
        venues.append(Venue(
            name: "Bitter End Coffee House",
            image: UIImage(named: "bitterEnd"),
            address: "752 Fulton St W, Grand Rapids, MI 49504",
            location: CLLocationCoordinate2D(
                latitude: 42.963360,
                longitude: -85687172
            ),
            artworks: [
                Artwork(
                    title: "Grand Rapids Skyline",
                    image: UIImage(named: "bitterEnd_1"),
                    artist: "John Doe",
                    description: "An interesting description",
                    medium: "Photography",
                    width: "24 in",
                    height: "18.5 in"
                )
                // Define additional Artwork objects here
            ]
        ))
        // Define additional Venue objects here
    }
}
With all of this defined, we’re ready to create the views that will facilitate this data!
Creating our views in the storyboard
We’ll start by adding a UINavigationController in the Storyboard view. This will be useful later when we want to navigate between our UITableView containing the list of artworks, and the View containing more detail about an individual artwork.
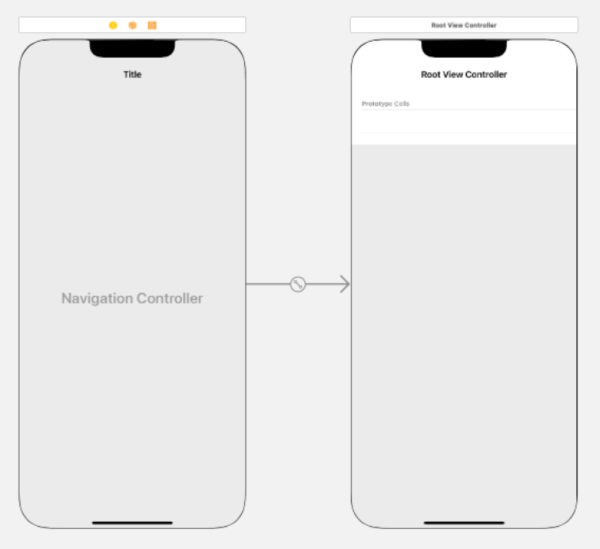
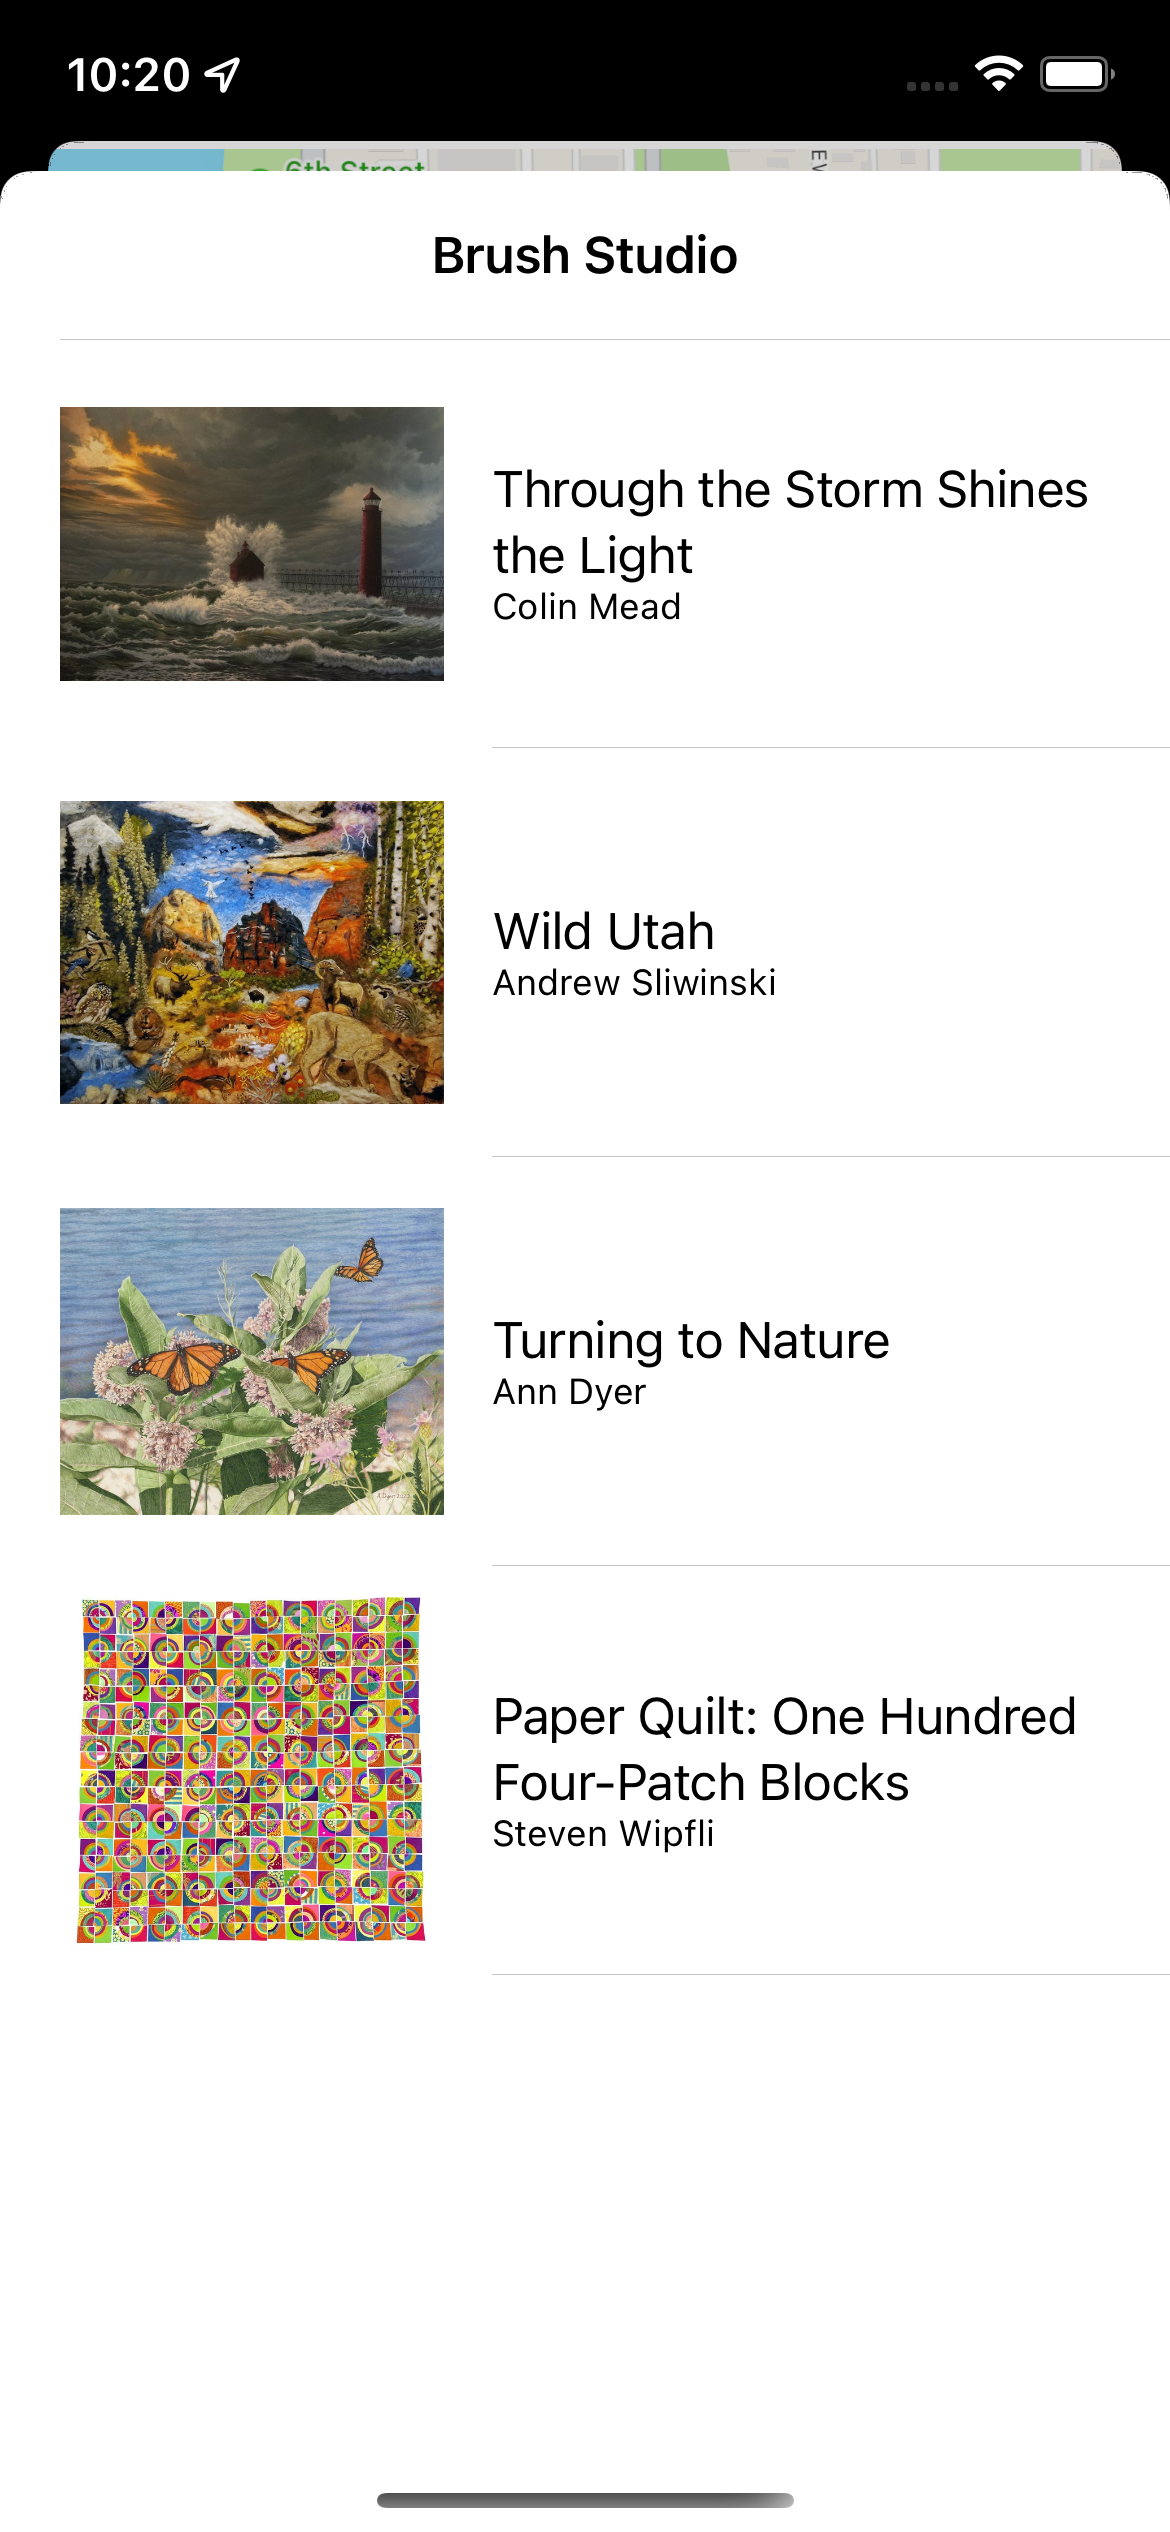
You’ll notice that the UINavigationController comes already equipped with a UITableView. We’ll be holding onto that as it’s just what we need for our list. Within this UITableView, you’ll see a single prototype TableViewCell. Feel free to edit the look of this to your liking. We’ll base our cell off of the “Subtitle” style, with an image included.
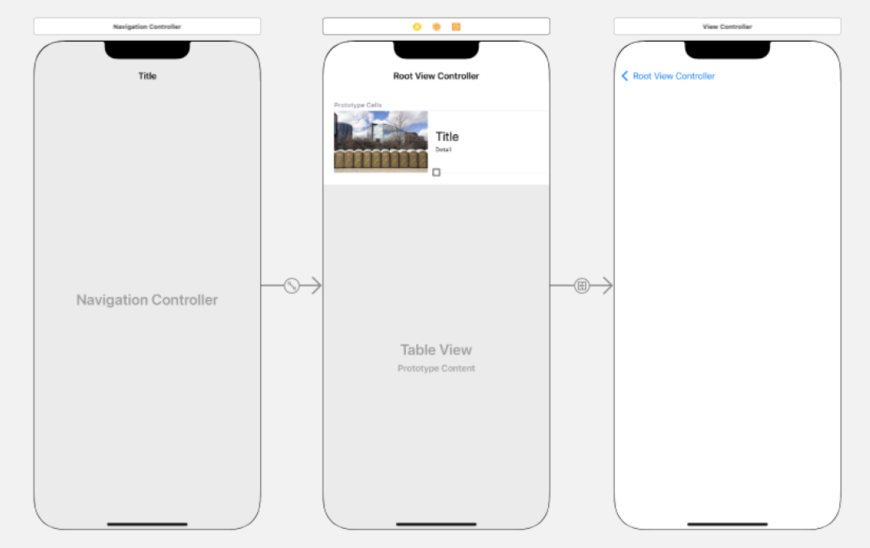
Next, we’ll set up the foundation for our detailed artwork view. Simply place a standard ViewController next to our UITableView, and create a segue from the prototype TableViewCell to the ViewController we just created.
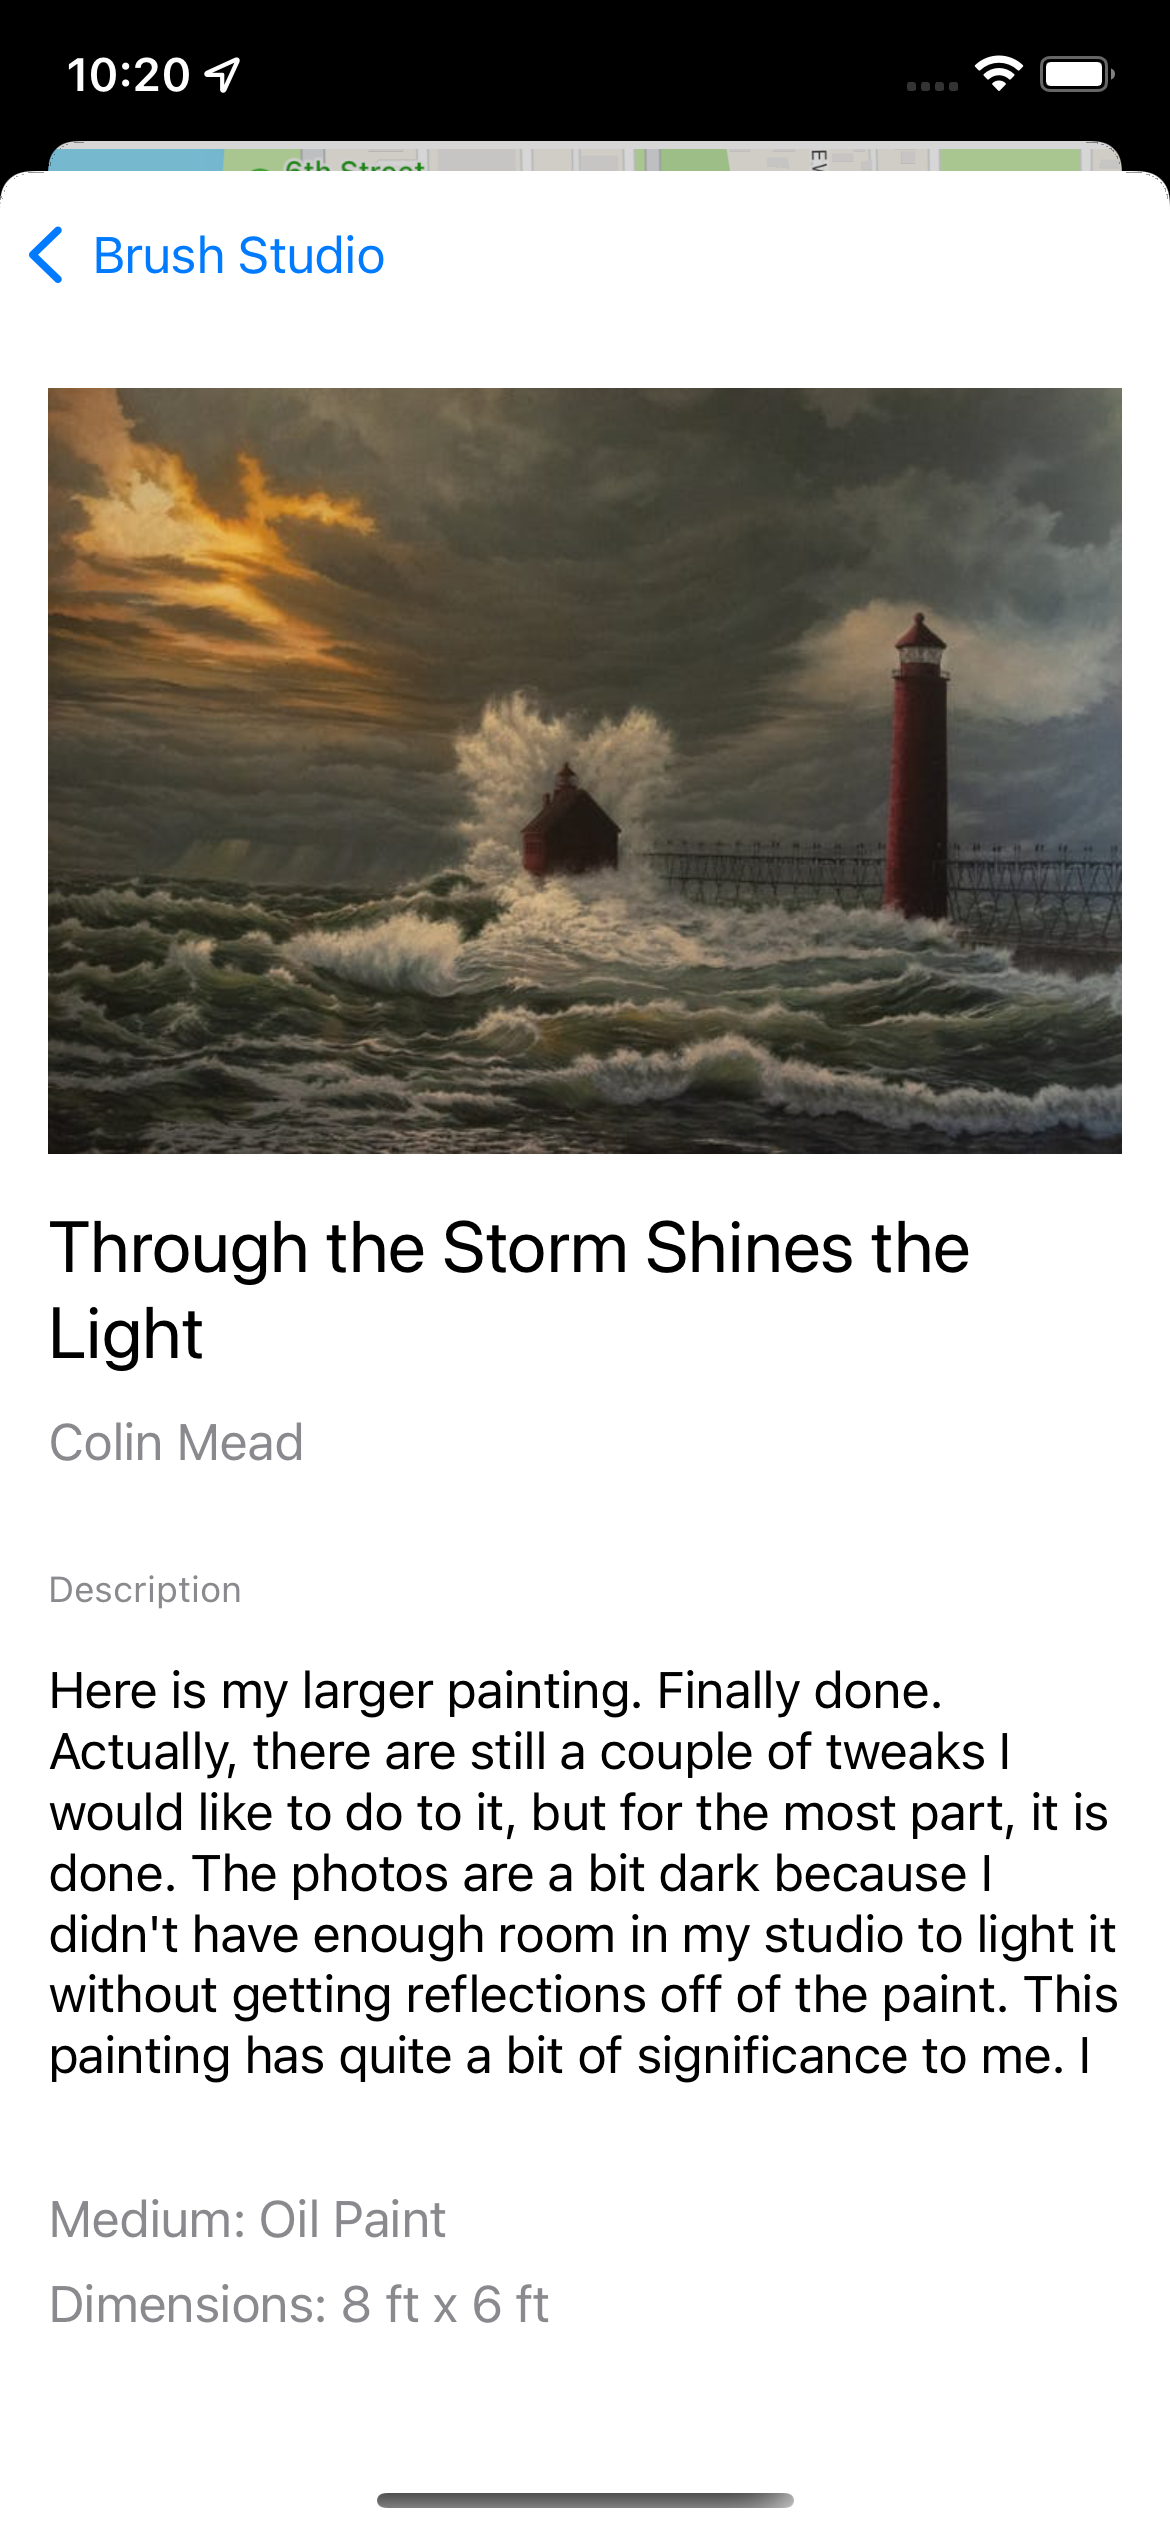
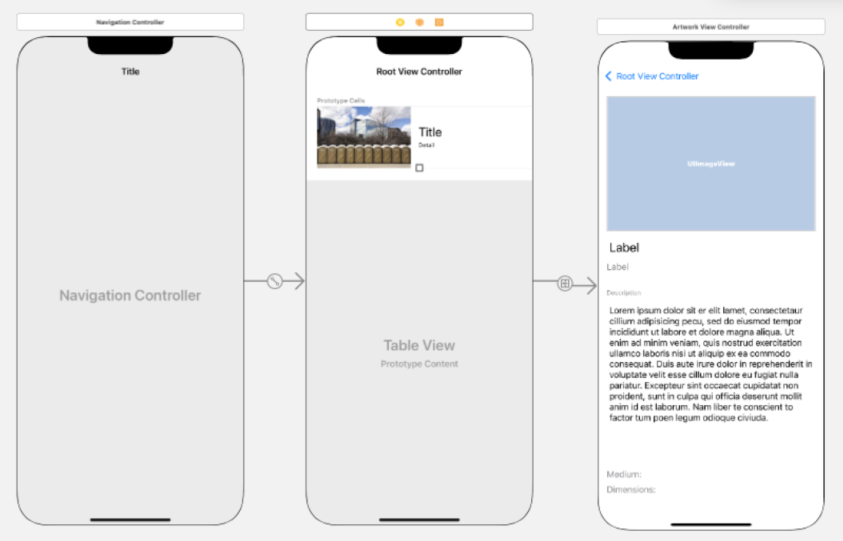
Within this newly-created ViewController, we placed all the necessary labels and images that correspond to our data. If you’re following along exactly, from top to bottom we have:
- An ImageView for an image of the artwork
- A TextView for the title of the work
- A Label for the name of the artist
- A Label (which will remain static) to signify the following description
- A TextView for the long-form description
- A Label for the medium
- A Label for the dimensions (width and height)
We’ll assume you know how to set up things like constraints, but this is how ours looks at a glance:
The ArtworkListViewController class
Now that our storyboard is ready to go, we can get to setting up the controller for our TableView. We created a new class called ArtworkListViewController that subclasses UITableViewController, through which we already inherit the required UITableViewDataSource and UITableViewDelegate protocols.
Next, we’ll go ahead and set up our outlets from the view in the storyboard to our newly-created class. Don’t forget to associate the class and its view within the storyboard. We do this by selecting the view and writing “ArtworkListViewController” (without quotes) in the Class field in the Identity Inspector. With that done, here’s what our class looks like so far:
import Foundation
import UIKit

class ArtworkListViewController: UITableViewController {

    @IBOutlet weak var topBar: UINavigationItem!
    @IBOutlet var artListTable: UITableView!

    var artworks: [Artwork]?
    var venueName: String?

    override func viewDidLoad() {
        super.viewDidLoad()
        self.tableView.delegate = self
        self.tableView.dataSource = self

        self.artworks = artworks!
        topBar.title = venueName!
    }
}
The first two member variables within the class are the list of Artwork objects within this venue, artworks, and the name of the venue, venueName which will be added to the top navigation bar.
What still needs doing is implementing the required function overrides for the UITableViewDataSource and UITableViewDelegate protocols:
// MARK: UITableViewDataSource
override func numberOfSections(in tableView: UITableView) -> Int {
    return 1
}

override func tableView(_ tableView: UITableView, numberOfRowsInSection section: Int) -> Int {
    if let art = self.artworks {
        return art.count
    } else {
        return 0
    }
}

override func tableView(_ tableView: UITableView, cellForRowAt indexPath: IndexPath) -> UITableViewCell {
    let cell = self.tableView.dequeueReusableCell(withIdentifier: "ArtworkCell", for: indexPath)

    if let artwork = self.artworks?[indexPath.row] {
        var content = cell.defaultContentConfiguration()

        content.text = artwork.title
        content.secondaryText = artwork.artist
        content.image = artwork.image
        content.imageProperties.maximumSize = CGSize(width: 128, height: 128)

        cell.contentConfiguration = content
    }
    return cell
}
You may notice within the definition for cell in the last overridden tableView() function, we reference a “reusable cell” with a specific identifier, in this case "ArtworkCell". We’ll want to define that in our storyboard by selecting the prototype cell in our TableView, going to the Attributes Inspector, and filling the Identifier field with “ArtworkCell” without quotes.
Next, we’re going to need some way to pass the relevant artwork information from a given cell to the ViewController on the other end of the segue. By overriding the prepare(for segue) function, we can do just that. This will be last thing we need to add to our ArtworkListViewController class.
// Pass Artwork object from relevant cell to segue destination (ArtworkViewController)
override func prepare(for segue: UIStoryboardSegue, sender: Any?) {
    if segue.identifier == "artworkViewSegue" {
        if let artworkVC = segue.destination as? ArtworkViewController {
            let selectedRow = tableView.indexPathForSelectedRow!.row

            artworkVC.artwork = artworks![selectedRow]
        }
    }
}
Just like before, where we had to provide an identifier for a prototype cell, we also need to provide an identifier for the segue between these two views. Simply select the segue in the storyboard and provide the relevant identifier in the Attributes inspector, under Identifier.
You may also notice that we reference an ArtworkViewController class, as well as some of its member variables. We haven’t created that yet, so let’s do that.
The ArtworkViewController class
With everything set up for our TableViewController, we can move on to our detailed artwork view. Let’s start by creating a new class to manage this ViewController, ArtworkViewController. Again, don’t forget to associate this with the view by changing its relevant Class field in the storyboard.
We can start getting things set up by creating outlets to just about everything in the view, like so:
import Foundation
import UIKit

class ArtworkViewController: UIViewController, UITextViewDelegate {

    @IBOutlet weak var artworkImage: UIImageView!
    @IBOutlet weak var artworkTitle: UITextView!
    @IBOutlet weak var artistName: UILabel!
    @IBOutlet weak var descriptionLabel: UILabel!
    @IBOutlet weak var artworkDescription: UITextView!
    @IBOutlet weak var mediumLabel: UILabel!
    @IBOutlet weak var dimensionsLabel: UILabel!

    override func viewDidLoad() {
        super.viewDidLoad()
    }

}
Our next task is to fill these UI elements with the relevant information. If you looked closely at the prepare(for segue) function in the last section, you might’ve noticed that we passed an Artwork object to the ArtworkViewController class, so let’s create that member variable now under our outlets:
var artwork: Artwork!
This object is the source of the artwork’s relevant information, and so we can go about filling the UI elements with data within the viewDidLoad() function:
override func viewDidLoad() {
    super.viewDidLoad()

    self.artworkImage.image = artwork.image
    self.artworkTitle.text = artwork.title
    self.artistName.text = artwork.artist
    self.artworkDescription.text = artwork.description ?? ""

    if artwork.description == nil {
        descriptionLabel.isHidden = true
    }

    self.mediumLabel.text?.append(artwork.medium ?? "")

    if (artwork.width != nil) || (artwork.height != nil) {
        self.dimensionsLabel.text?.append((artwork.width!) + " x " + (artwork.height!))
    }

    // removes leading edge padding from UITextViews
    self.artworkTitle.textContainer.lineFragmentPadding = 0.0
    self.artworkDescription.textContainer.lineFragmentPadding = 0.0
}
And that’s it! Next we can move on to integrating MapKit at the core of our application!
Setting up MapKit
The first step in using the MapKit API is importing it into the project. Import MapKit at the top level of the main ViewController. To get a MapView, pen the object library, find an MKMapView, and drag it into the main screen, setting the margins to the edges beyond the safe zone. In the main view controller, create an outlet named mapView of type MKMapView? to reference this view. Lastly, in the viewDidLoad function, set the mapView’s delegate to self. This could alternatively be done programmatically by defining an MKMapView object and editing some of its properties.
Setting up a location manager
Import CoreLocation under MapKit. Define a new private constant locationManager and initialize it as a CLLocationManager object. This object is what allows you to deliver and handle location-related events in the application. Right now, we will use it to handle the user’s location information and changes to its state. To do so, the next thing to be done is make the view controller conform to the CLLocationManagerDelegate protocol via an extension below the primary class.
We will override three of the delegate functions within this: didUpdateLocations, which will be used to update the map based on user location changes; didFailWithError, which is recommended by the Apple documentation to respond to any errors while updating the location; and didChangeAuthorization, checking the state of the user’s location permissions given to the application. For now, leave these empty as we will write functions to handle these conditions and call them in them later on.
User location functions
With a location manager defined, the next step is to begin writing functions to handle the user’s location.
Write a new function named setUpLocationManager. This will be used to set the location manager to self, set the desired accuracy, and start updating the user location by calling startUpdatingLocation on the locationManager object. It should resemble the following:
func setUpLocationManager() {
    locationManager.delegate = self
    locationManager.desiredAccuracy = kCLLocationAccuracyBest
    locationManager.startUpdatingLocation()
}
startUpdatingLocation returns immediately and will cause locationManager to grab an initial location and notify the delegate.
Write another function, checkLocationPermissions, that will check if the device’s location services are enabled. If so, it will set up the location manager and next check the location authorization, the logic of which will be in a following function. Otherwise, indicate that the location services are disabled on the device. This function should look like this:
func checkLocationPermissions() {
    if CLLocationManager.locationServicesEnabled() {
        setUpLocationManager()
        checkLocationAuthorization()
    } else {
        print("Location services are disabled on current device.")
    }
}
Note
Ideally, you would display an alert to the user to notify them of these issues, but since the primary focus is on map functionality and setting up custom alerts can be tedious, this is ommitted and we just print a meaningful message to the console.
The next function will be the aforementioned checkLocationAuthorization function called in the previous one. This will include an exhaustive switch statement that will be important for checking the authorizationStatus property on the locationManager object to check the location permissions the user has given the application. Swift requires that this be exhaustive, but not every case will be relevant to this tutorial. The statement should follow the format:
switch locationManager.authorizationStatus {
case .authorizedAlways:
    mapView.showsUserLocation = true
    centerOnUserLocation()
    locationManager.startUpdatingLocation()
    break
case .authorizedWhenInUse:
    mapView.showsUserLocation = true
    centerOnUserLocation()
    locationManager.startUpdatingLocation()
    break
case .denied:
    print("User denied request for location services")
    break
case .restricted:
    print("User's location services are restricted")
    break
case .notDetermined:
    locationManager.requestWhenInUseAuthorization()
    break
@unknown default:
    print("Unknown/other location permissions (fatal)")
}
Note
When running in a simulator rather than a physical iOS device, the simulator cannot deduce its current location. Use Features > Location > Custom Location and enter geocoordinates to generate a simulated user location.
In either case of the user authorizing constant location tracking or just when in use, we will tell the mapView to show the user location and call centerOnUserLocation, which will be written later. We will then start updating the location. If the user has denied the request, or the services are restricted in settings, print a specific statement to the console. Again, this would ideally be handled with a custom alert so that the user is aware of what went wrong. If not determined, we will simply request the location for when the application is in use as a constant location outside of using the app is not relevant. Otherwise, if the state is unknown, print a statement indicating so to the console.
The next important function is centerOnUserLocation as it is called in some cases of the previous function. This will just make sure that the screen’s focal point is the user’s current location. First, unwrap locationManager.location?.coordinate via optional binding into a variable location and initialize an MKCoordinateRegion to center on this location. Set the latitudinalMeters and longitudinalMeters each to 10000 (this is more appropriately done with a global constant) and call setRegion on the mapView to center on the predefined region.
func centerOnUserLocation() {
    if let location = locationManager.location?.coordinate {
        let region = MKCoordinateRegion.init(center: location,
                                             latitudinalMeters: regionInMeters,
                                             longitudinalMeters: regionInMeters)
        mapView.setRegion(region, animated: true)
    }
}
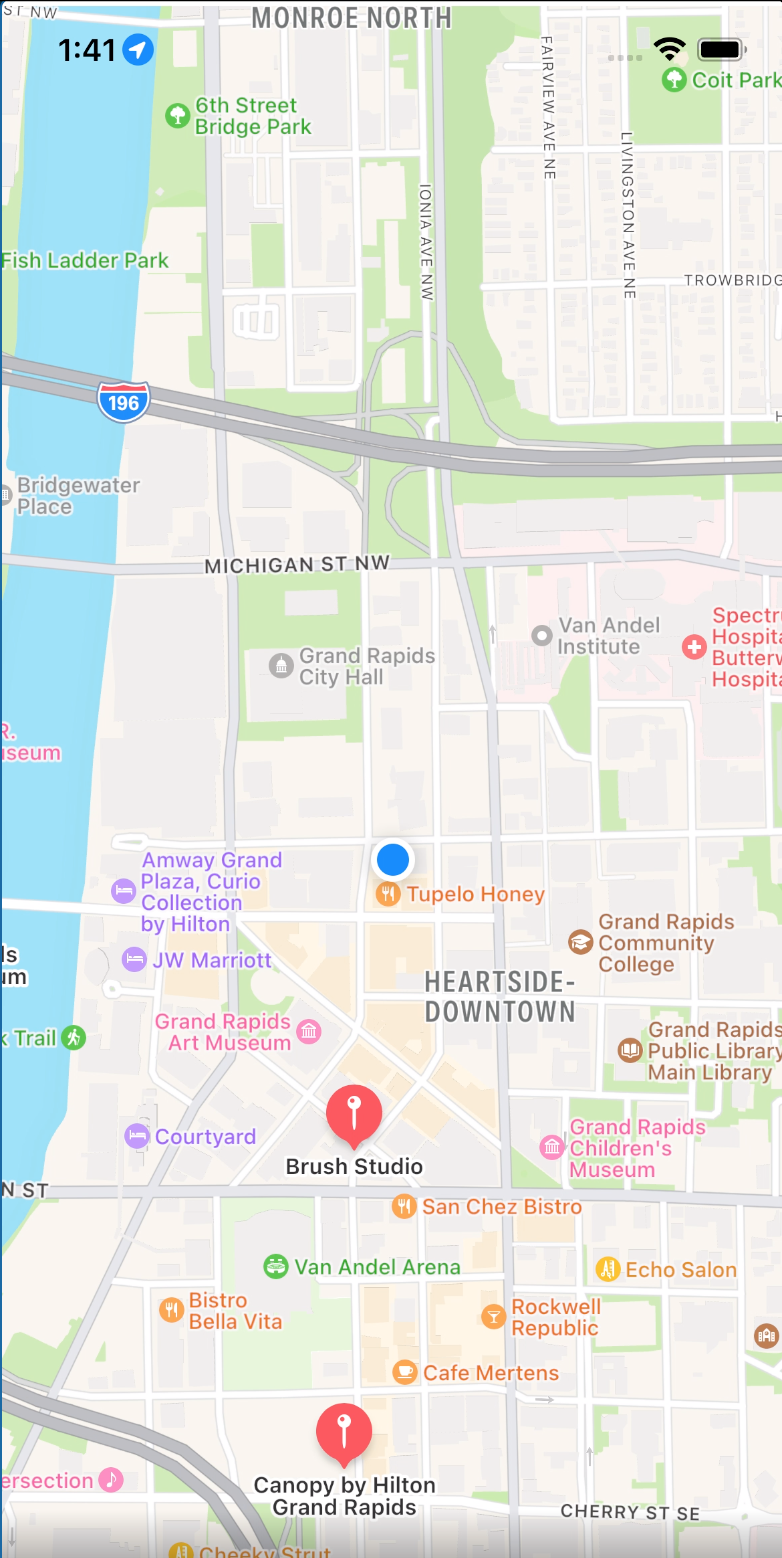
Finally, we need to generate the annotations and views for the venue data described earlier. To do so, a basic function createAnnotations that takes a list of venues iterates through the list, creating an MKPointAnnotation with the respective venue’s location, name, and address infromation and adds it to the map.
func createAnnotations(venues: [Venue]) {
for venue in venues {
    let annotation = MKPointAnnotation(
	__coordinate: venue.location!,
	title: venue.name,
	subtitle: venue.address
    )
    mapView.addAnnotation(annotation)
  }
}
The simulated location and generated venue annotations should now appear on the map at the specified coordinates, like so:
Delegate Extensions
Because the main view controller conforms to both the MKMapViewDelegate and CLLocationManagerDelegate protocols, it must implement their required functions. This can be done a few different ways, but Swift style practices suggest these in extensions of the ViewController for better code organization.
In the CLLocationManagerDelegate, we will now write the bodies of the previously mentioned functions.
- For
didUpdateLocations, we need to unwraplocations.last, this time using theguardsyntax so that the function will return on nil. The purpose of this function is to update the location on the map when it changes (e.g., when the user moves, etc.), so we will want a variable holding the coordinates of their last known location. Next, define and initialize a region variable similar to how it was done incenterOnUserLocation, this time centered on the user’s last known location, and finally set themapViewregion to this region. didChangeAuthorizationis used to track any state changes to the application’s location use authorization. CallcheckLocationAuthorizationin its body.- The
didFailWithErrorfunction signature is similar todidChangeAuthorization, but its second parameter is instead an error. For now, in this case, printswift "Error: \(String(describing: error))"to the console. The format of the printed error is necessary for easier debugging.
Next is the MKMapViewDelegate protocol functions. Again, these functions will be added via an extension in the main view controller. There are three functions implemented here, two of which are important:
- The first function is essential for performance while generating the map annotation views. There are different ways to do this, but this is essentially the go-to as it is far easier on the device performance-wise. Similar to why we dequeue table cells in a UITableView, this concept is applicable to annotation views to reuse
MKAnnotationViewswith an identifier. This is also the function in which we can specify the annotation callout’s attributes, like its accessory views. What’s returned is anMKMarkerAnnotationView. - The next function handles when a venue callout has been tapped via
calloutAccessoryControlTapped. Given that the application uses the newly availableUISheetPresentationController, it is important to check the software level of the device (in this case, that it is iOS 15+). When tapped, the halfsheet is presented displaying venue-specific information.
The source code can be referenced to see how these functions are written.
Note
As is done in the source code, you might also consider overriding the MKMapViewDelegate rendererFor function to change the line color (and potentially other polyline properties). We used red, but there are several available.
Connecting MapView and Venue, Artwork Views
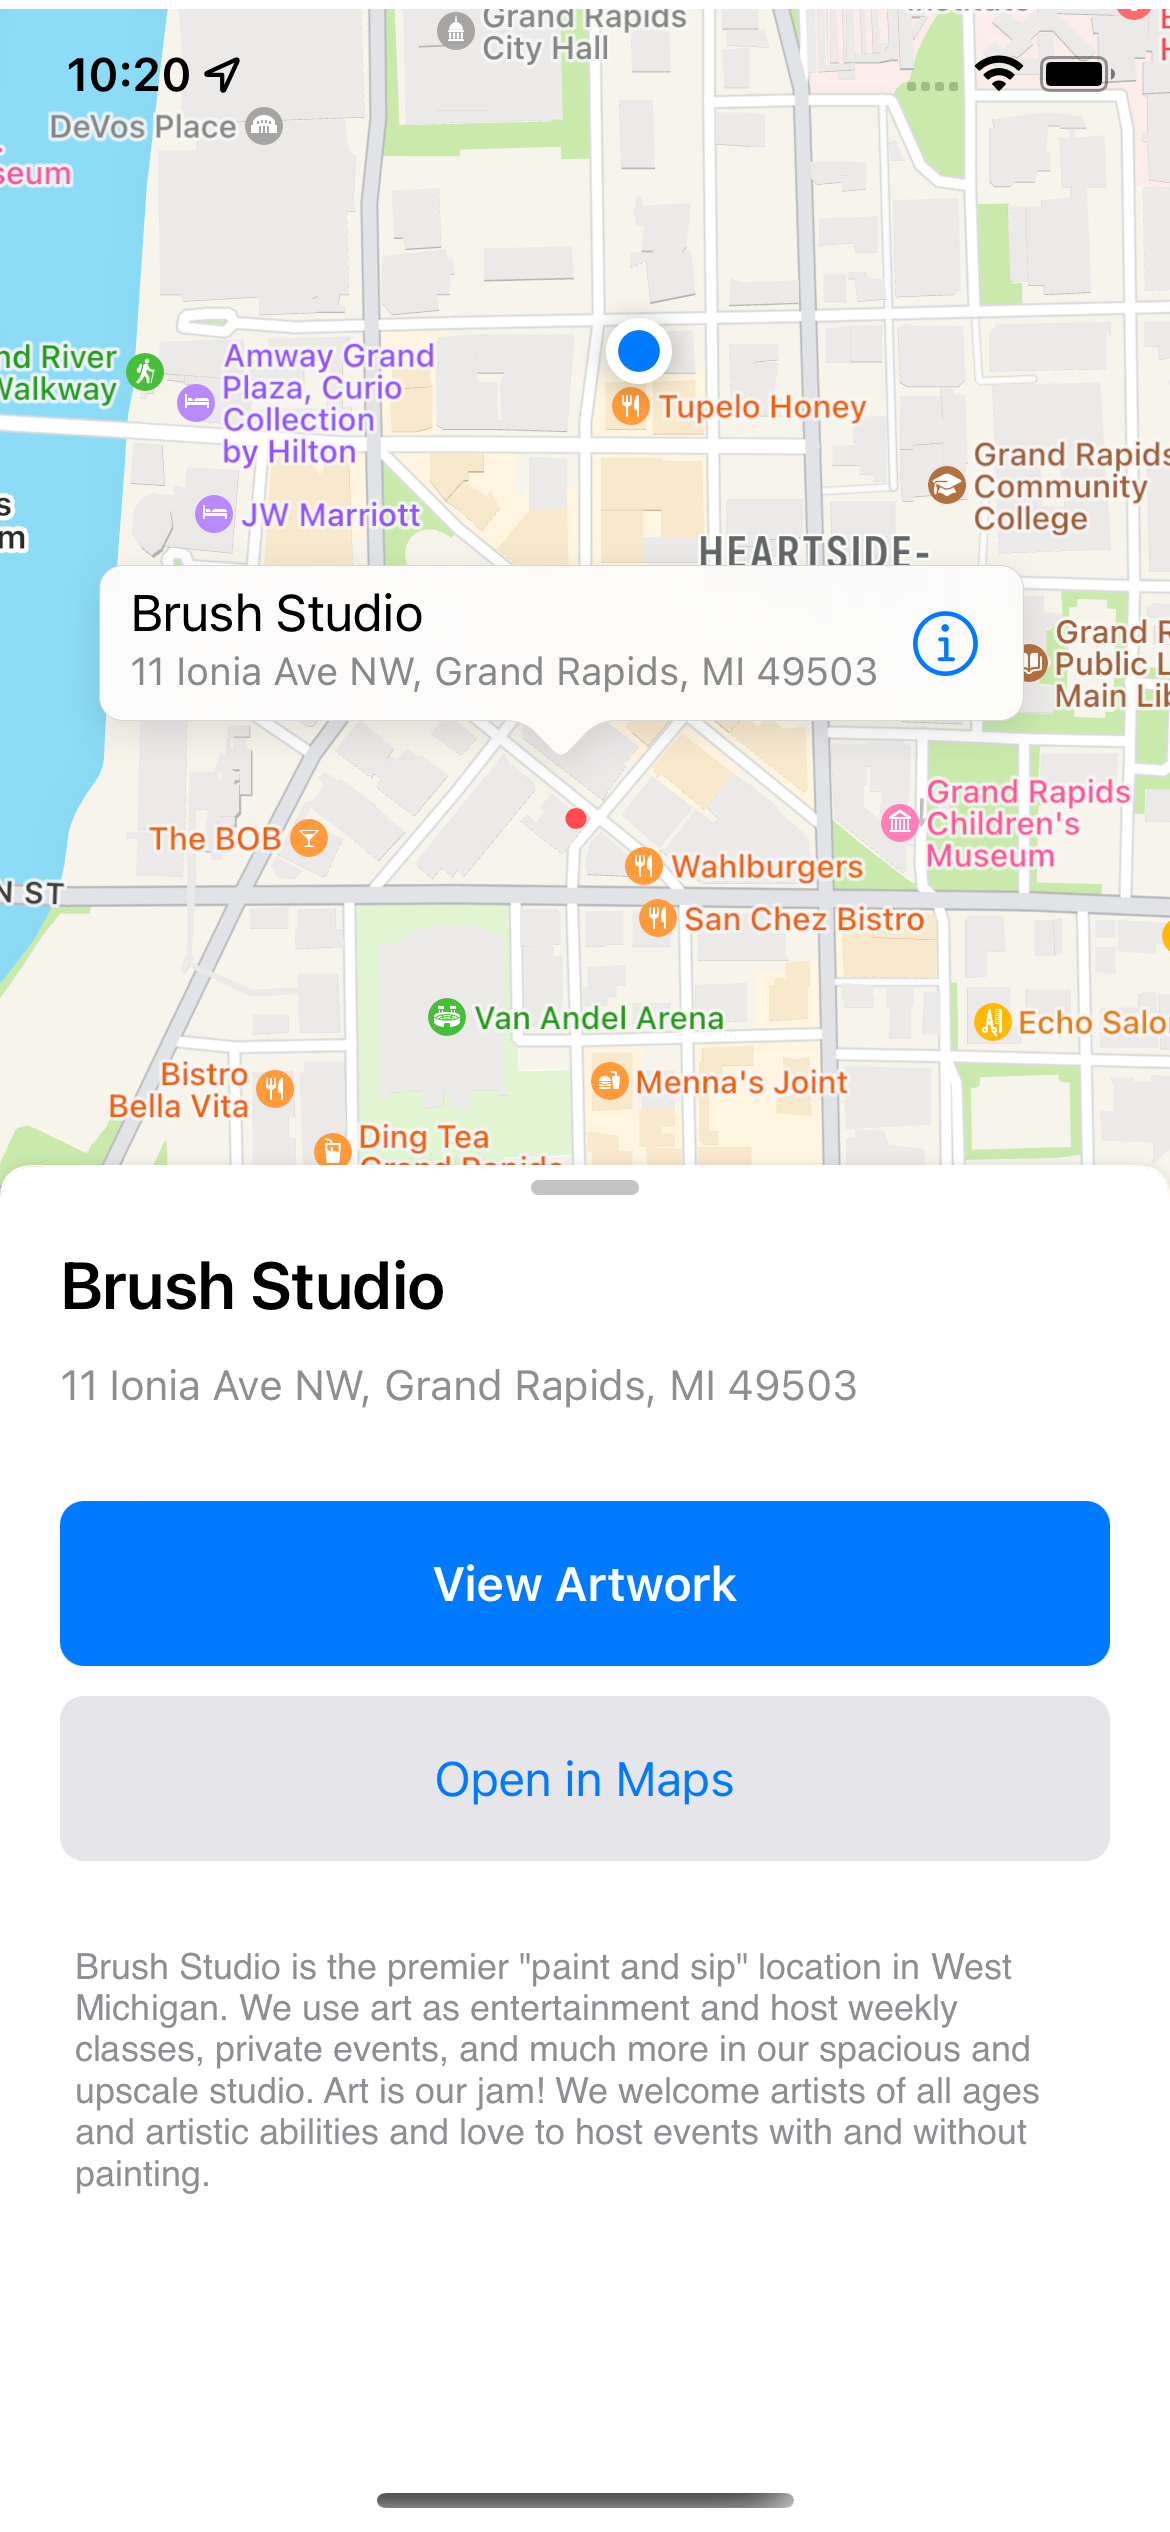
Thus far, we’ve explored setting up all of our app’s main views, but don’t have a way to get from the map to an individual venue and list of artwork. In the spirit of iOS Maps app, we explored several ways to display a “bottom half drawer” overtop of the map view. While there are some well-reviewed community-developed options, it seemed that going forward the best solution is UISheetPresentationController. This allows the app to present some options and information to the user without losing sight of map location or needing to fully leave that view.
The UISheetPresentationController has several customizations that can be used to control the height (detent) and scrolling/swiping UX:
if #available(iOS 15.0, *) {
    if let sheet = vc.sheetPresentationController {
	sheet.detents = [.medium(), .large()]
	sheet.largestUndimmedDetentIdentifier = .medium
	sheet.prefersScrollingExpandsWhenScrolledToEdge = true
	sheet.prefersGrabberVisible = true
    }
} else {
    // Fallback on earlier versions
}
In a production app supporting iOS < v.15.0, an alternative would need to be implemented, such as a standard navigation controller.
In VenueSheetViewController, presented as a sheet, we display buttons to navigate to the venue view, or to pop to Maps for directions.
Further Reading and Conclusions
Full directions functionality
For the sake of this tutorial, we did not fully implement directions within the application as this became lengthy and complex. However, this is still something supported by MapKit, and can be done with an MKDirections object and directions requests. This is partially implemented in the code for demonstration, but requires more in order to give step-by-step routes with time estimates, travel methods, and dozens of other features. For our purposes, we just used a button on the venue halfsheet to redirect to iOS’s existing maps application, but this functionality is still very much accessible. We geared our focus more toward displaying venue information on a map that gives visitors a better idea of what is nearby.
Ultimately, this tutorial merely produces a foundation from which one could build off of and add several new features to. Additionally, there is not necessarily a single way to produce the same outcome; alternative methods are available to create the application.